
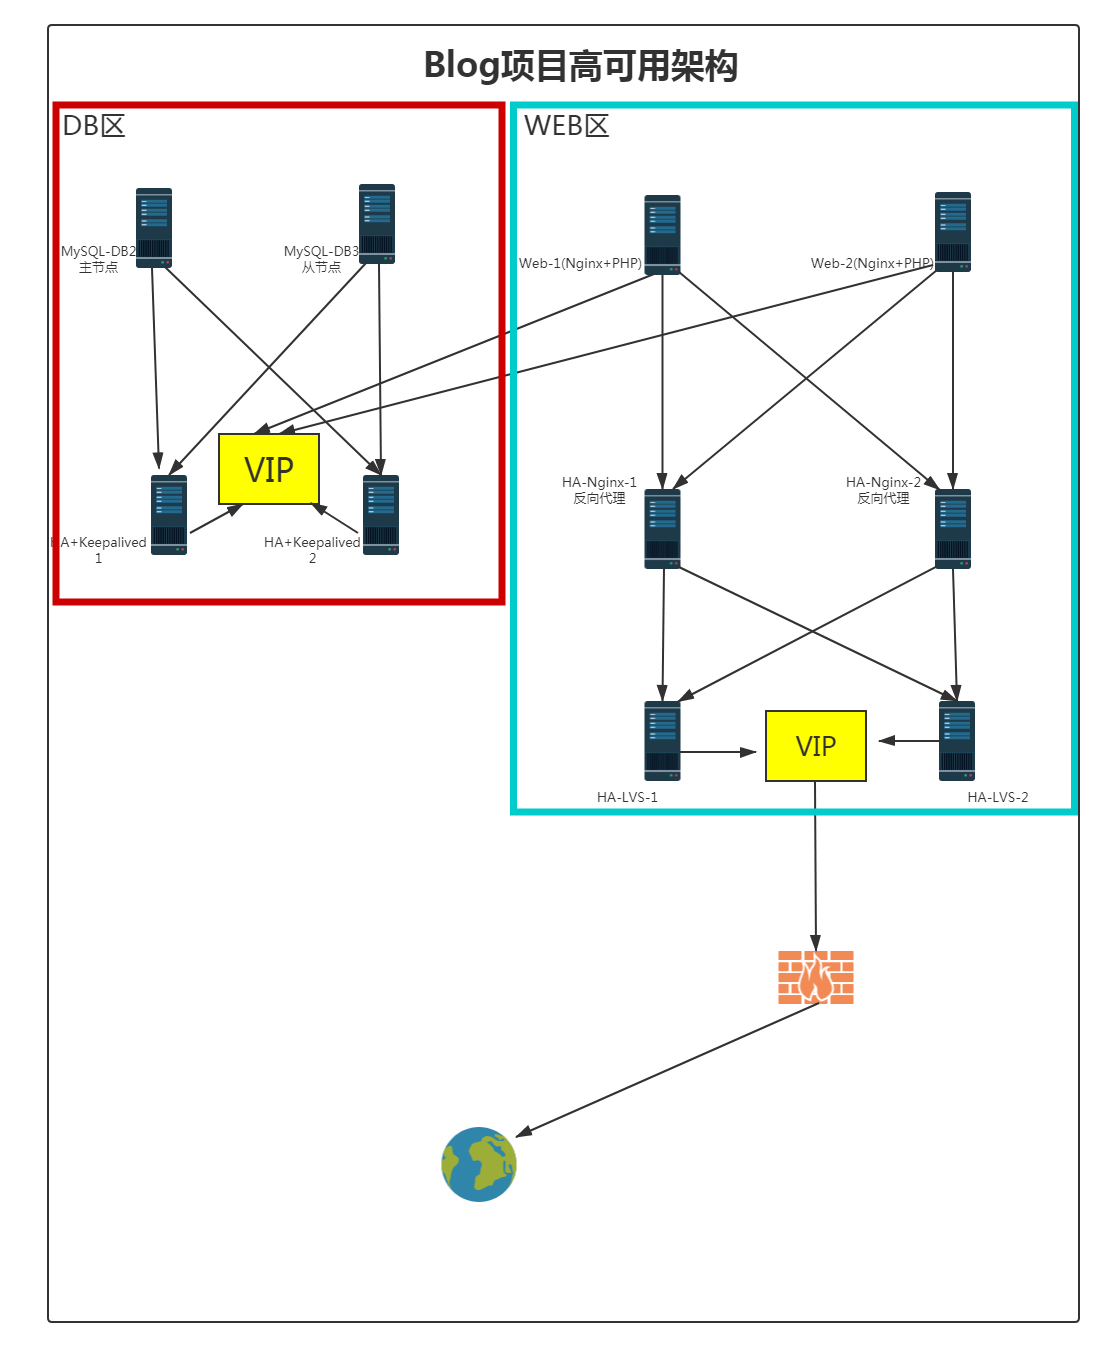
一 . 拓扑
二 .部署NGINX反向代理
- 部署过程
[root@ha-ng-1 ~]# hostanmectl set-hostname HA-NG-1[root@ha-ng-2 ~]# hostanmectl set-hostname HA-NG-2[root@ha-ng-1 ~]# systemctl stop firewalld.service[root@ha-ng-2 ~]# systemctl stop firewalld.service[root@ha-ng-1 ~]# sed -i 's/SELINUX=enforcing/SELINUX=disabled/g' /etc/sysconfig/selinux[root@ha-ng-2 ~]# sed -i 's/SELINUX=enforcing/SELINUX=disabled/g' /etc/sysconfig/selinux[root@ha-ng-1 ~]# yum install epel-release -y[root@ha-ng-2 ~]# yum install epel-release -y[root@ha-ng-1 ~]# yum install nginx –y[root@ha-ng-2 ~]# yum install nginx –y
2.配置过程
配置新建nginx配置
[root@ha-ng-1 conf.d]# pwd/etc/nginx/conf.d[root@ha-ng-1 conf.d]# lsblog.conf[root@ha-ng-2 conf.d]# pwd/etc/nginx/conf.d[root@ha-ng-2 conf.d]# lsblog.conf[root@ha-ng-1 conf.d]# cat blog.conf upstream blog { ip_hash; #sticky expires=12h; server 192.168.1.161:443; server 192.168.1.162:443; #check interval=3000 rise=2 fall=3 timeout=1000 type=http; #check interval=3000 rise=2 fall=3 timeout=1000 type=tcp; keepalive 20; } server { listen 80; server_name www.starz.top; return 301 https://$server_name$request_uri; location / { root html; index index.php index.html index.htm Login.aspx; } } server { listen 443 ssl; server_name www.starz.top; ##ssl on; ssl_certificate /etc/nginx/cert/blog.pem; #放置证书位置 ssl_certificate_key /etc/nginx/cert/blog.key; #放置证书位置 ssl_session_timeout 5m; ssl_protocols TLSv1 TLSv1.1 TLSv1.2; ssl_ciphers ALL:!ADH:!EXPORT56:RC4+RSA:+HIGH:+MEDIUM:+LOW:+SSLv2:+EXP; ssl_prefer_server_ciphers on; location / { proxy_pass https://blog; proxy_set_header Host $host; proxy_set_header X-Real-IP $remote_addr; proxy_set_header REMOTE-HOST $remote_addr; proxy_set_header X-Forwarded-For $proxy_add_x_forwarded_for; #proxy_cache webserver; proxy_cache_valid 200 10m; proxy_read_timeout 300; proxy_send_timeout 300; } error_page 500 502 503 504 /50x.html; location = /50x.html { root html; } }
注意:因为要设置301重写,用户键入www.starz.top可以自动跳转https://www.starz.top,需要用到80端口,需要修改nginx.conf (红色加粗处)
 [root@ha-ng-1 nginx]# cat nginx.conf
 # For more information on configuration, see:
 #   * Official English Documentation: http://nginx.org/en/docs/
 #   * Official Russian Documentation: http://nginx.org/ru/docs/

 user nginx;
 worker_processes auto;
 error_log /var/log/nginx/error.log;
 pid /run/nginx.pid;

 # Load dynamic modules. See /usr/share/doc/nginx/README.dynamic.
 include /usr/share/nginx/modules/*.conf;

 events {
     worker_connections 1024;
 }

 http {
     log_format  main  '$remote_addr - $remote_user [$time_local] "$request" '
                       '$status $body_bytes_sent "$http_referer" '
                       '"$http_user_agent" "$http_x_forwarded_for"';

     access_log  /var/log/nginx/access.log  main;

     sendfile            on;
     tcp_nopush          on;
     tcp_nodelay         on;
     keepalive_timeout   65;
     types_hash_max_size 2048;

     include             /etc/nginx/mime.types;
     default_type        application/octet-stream;

     # Load modular configuration files from the /etc/nginx/conf.d directory.
     # See http://nginx.org/en/docs/ngx_core_module.html#include
     # for more information.
     include /etc/nginx/conf.d/*.conf;

     # server {
         # listen       80 default_server;
         # listen       [::]:80 default_server;
         # server_name  _;
         # root         /usr/share/nginx/html;

         # Load configuration files for the default server block.
         # include /etc/nginx/default.d/*.conf;

         # location / {
         # }

         # error_page 404 /404.html;
         # location = /404.html {
         # }

         # error_page 500 502 503 504 /50x.html;
         # location = /50x.html {
         # }
     # }

 # Settings for a TLS enabled server.
 #
 #    server {
 #        listen       443 ssl http2 default_server;
 #        listen       [::]:443 ssl http2 default_server;
 #        server_name  _;
 #        root         /usr/share/nginx/html;
 #
 #        ssl_certificate "/etc/pki/nginx/server.crt";
 #        ssl_certificate_key "/etc/pki/nginx/private/server.key";
 #        ssl_session_cache shared:SSL:1m;
 #        ssl_session_timeout  10m;
 #        ssl_ciphers HIGH:!aNULL:!MD5;
 #        ssl_prefer_server_ciphers on;
 #
 #        # Load configuration files for the default server block.
 #        include /etc/nginx/default.d/*.conf;
 #
 #        location / {
 #        }
 #
 #        error_page 404 /404.html;
 #        location = /404.html {
 #        }
 #
 #        error_page 500 502 503 504 /50x.html;
 #        location = /50x.html {
 #        }
 #    }

 }
三. 部署LVS+Keepalived
1.配置反向代理的环回网卡(两台代理均需配置)
 [root@ha-ng-1 nginx]# cat /etc/sysconfig/network-scripts/ifcfg-lo
 TYPE=Ethernet
 OTPROTO=static
 DEFROUTE=yes
 PEERDNS=yes
 PEERROUTES=yes
 IPV4_FAILURE_FATAL=no
 NAME=lo:0
 DEVICE=lo:0
 ONBOOT=yes
 IPADDR=192.168.1.140    #这个环回网卡地址=VIP地址(下文将会提到)
 NETMASK=255.255.255.255
2.配置反向代理的sysctl配置(新增红色加粗) (两台代理均需配置)
 [root@ha-ng-1 nginx]# cat /etc/sysctl.conf
 # sysctl settings are defined through files in
 # /usr/lib/sysctl.d/, /run/sysctl.d/, and /etc/sysctl.d/.
 #
 # Vendors settings live in /usr/lib/sysctl.d/.
 # To override a whole file, create a new file with the same in
 # /etc/sysctl.d/ and put new settings there. To override
 # only specific settings, add a file with a lexically later
 # name in /etc/sysctl.d/ and put new settings there.
 #
 # For more information, see sysctl.conf(5) and sysctl.d(5).
 net.ipv4.conf.lo.arp_ignore = 1
 net.ipv4.conf.lo.arp_announce = 2
 net.ipv4.conf.all.arp_ignore = 1
 net.ipv4.conf.all.arp_announce = 2
 net.ipv4.ip_forward = 0
注意:配置完毕需要重启OS
 [root@ha-lvs-1 ~]# hostnamectl set-hostname ha-lvs-1
 [root@ha-lvs-2 ~]# hostnamectl set-hostname ha-lvs-2
 [root@ha-lvs-1 ~]# systemctl stop firewalld.service
 [root@ha-lvs-2 ~]# systemctl stop firewalld.service
 [root@ha-lvs-1 ~]# sed -i 's/SELINUX=enforcing/SELINUX=disabled/g' /etc/sysconfig/selinux
 [root@ha-lvs-2 ~]# sed -i 's/SELINUX=enforcing/SELINUX=disabled/g' /etc/sysconfig/selinux
 安装keepalived 和 ipvsadm
 [root@ha-lvs-1 ~]# yum -y install keepalived ipvsadm gcc openssl openssl-deve
 [root@ha-lvs-2 ~]# yum -y install keepalived ipvsadm gcc openssl openssl-deve
 [root@ha-lvs-1 ~]# cp /etc/keepalived/keepalived.conf /etc/keepalived/keepalived.conf.backup
 [root@ha-lvs-2 ~]# cp /etc/keepalived/keepalived.conf /etc/keepalived/keepalived.conf.backup
配置keepalived
Master节点(ha-lvs-1)配置
 [root@ha-lvs-1 ~]# cat /etc/keepalived/keepalived.conf
 global_defs {
    #notification_email {
          #396796725@qq.com
    #}
    #notification_email_from 396796725@qq.com
    #smtp_server 192.168.1.1   #邮箱服务器地址
    #smtp_connection_timeout 30
    router_id LVS_DEVEL  # 设置lvs的id,在一个网络内应该是唯一的
 }
 vrrp_instance VI_1 {
     state MASTER   #指定Keepalived的角色,MASTER为主,BACKUP为备 记得大写
     interface ens192  #网卡id 不同的电脑网卡id会有区别 可以使用:ip a查看
     virtual_router_id 51  #虚拟路由编号,主备要一致
     priority 100  #定义优先级,数字越大,优先级越高,主DR必须大于备用DR
     advert_int 1  #检查间隔,默认为1s
     authentication {   #这里配置的密码最多为8位,主备要一致,否则无法正常通讯
         auth_type PASS
         auth_pass 1111
     }
     virtual_ipaddress {
         192.168.1.140  #定义虚拟IP(VIP)为192.168.1.200,可多设,每行一个
     }
 }
 # 定义Blog的SSL端口(443端口)和301地址重写的端口(80端口)
 virtual_server 192.168.1.140 443 {
     delay_loop 6 # 设置健康检查时间,单位是秒
     lb_algo rr # 设置负载调度的算法为wlc
     lb_kind DR # 设置LVS实现负载的机制,有NAT、TUN、DR三个模式
     nat_mask 255.255.255.0
     persistence_timeout 0
     protocol TCP
     real_server 192.168.1.136 443 {  # 指定real server1的IP地址
         weight 3   # 配置节点权值,数字越大权重越高
         TCP_CHECK {
         connect_timeout 10
         nb_get_retry 3
         delay_before_retry 3
         connect_port 443
         }
     }
     real_server 192.168.1.137 443 {  # 指定real server2的IP地址
         weight 3  # 配置节点权值,数字越大权重越高
         TCP_CHECK {
         connect_timeout 10
         nb_get_retry 3
         delay_before_retry 3
         connect_port 443
         }
      }
 }
 virtual_server 192.168.1.140 80 {
     delay_loop 6 # 设置健康检查时间,单位是秒
     lb_algo rr # 设置负载调度的算法为wlc
     lb_kind DR # 设置LVS实现负载的机制,有NAT、TUN、DR三个模式
     nat_mask 255.255.255.0
     persistence_timeout 0
     protocol TCP
     real_server 192.168.1.136 80 {  # 指定real server1的IP地址
         weight 3   # 配置节点权值,数字越大权重越高
         TCP_CHECK {
         connect_timeout 10
         nb_get_retry 3
         delay_before_retry 3
         connect_port 80
         }
     }
     real_server 192.168.1.137 80 {  # 指定real server2的IP地址
         weight 3  # 配置节点权值,数字越大权重越高
         TCP_CHECK {
         connect_timeout 10
         nb_get_retry 3
         delay_before_retry 3
         connect_port 80
         }
      }
 }
Backup节点(ha-lvs-2)配置
 global_defs {
    #notification_email {
          #396796725@qq.com
    #}
    #notification_email_from 396796725@qq.com
    #smtp_server 192.168.1.1   #邮箱服务器地址
    #smtp_connection_timeout 30
    router_id LVS_DEVEL  # 设置lvs的id,在一个网络内应该是唯一的
 }
 vrrp_instance VI_1 {
     state BACKUP #指定Keepalived的角色,MASTER为主,BACKUP为备 记得大写
     interface ens192  #网卡id 不同的电脑网卡id会有区别 可以使用:ip a查看
     virtual_router_id 51  #虚拟路由编号,主备要一致
     priority 50  #定义优先级,数字越大,优先级越高,主DR必须大于备用DR
     advert_int 1  #检查间隔,默认为1s
     authentication {   #这里配置的密码最多为8位,主备要一致,否则无法正常通讯
         auth_type PASS
         auth_pass 1111
     }
     virtual_ipaddress {
         192.168.1.140  #定义虚拟IP(VIP)为192.168.1.200,可多设,每行一个
     }
 }
 # 定义Blog的SSL端口(443端口)和301地址重写的端口(80端口)
 virtual_server 192.168.1.140 443 {
     delay_loop 6 # 设置健康检查时间,单位是秒
     lb_algo rr # 设置负载调度的算法为wlc
     lb_kind DR # 设置LVS实现负载的机制,有NAT、TUN、DR三个模式
     nat_mask 255.255.255.0
     persistence_timeout 0
     protocol TCP
     real_server 192.168.1.136 443 {  # 指定real server1的IP地址
         weight 3   # 配置节点权值,数字越大权重越高
         TCP_CHECK {
         connect_timeout 10
         nb_get_retry 3
         delay_before_retry 3
         connect_port 443
         }
     }
     real_server 192.168.1.137 443 {  # 指定real server2的IP地址
         weight 3  # 配置节点权值,数字越大权重越高
         TCP_CHECK {
         connect_timeout 10
         nb_get_retry 3
         delay_before_retry 3
         connect_port 443
         }
      }
 }
 virtual_server 192.168.1.140 80 {
     delay_loop 6 # 设置健康检查时间,单位是秒
     lb_algo rr # 设置负载调度的算法为wlc
     lb_kind DR # 设置LVS实现负载的机制,有NAT、TUN、DR三个模式
     nat_mask 255.255.255.0
     persistence_timeout 0
     protocol TCP
     real_server 192.168.1.136 80 {  # 指定real server1的IP地址
         weight 3   # 配置节点权值,数字越大权重越高
         TCP_CHECK {
         connect_timeout 10
         nb_get_retry 3
         delay_before_retry 3
         connect_port 80
         }
     }
     real_server 192.168.1.137 80 {  # 指定real server2的IP地址
         weight 3  # 配置节点权值,数字越大权重越高
         TCP_CHECK {
         connect_timeout 10
         nb_get_retry 3
         delay_before_retry 3
         connect_port 80
         }
      }
 }
配置文件写完后,启动keepalived服务
 [root@ha-lvs-1 ~]# systemctl start keepalived
 [root@ha-lvs-2 ~]# systemctl start keepalived
查看LVS状态
 [root@ha-lvs-1 ~]# ipvsadm -ln
 IP Virtual Server version 1.2.1 (size=4096)
 Prot LocalAddress:Port Scheduler Flags
   -> RemoteAddress:Port           Forward Weight ActiveConn InActConn
 TCP  192.168.1.140:80 rr
   -> 192.168.1.136:80             Route   3      0          0
   -> 192.168.1.137:80             Route   3      0          0
 TCP  192.168.1.140:443 rr
   -> 192.168.1.136:443            Route   3      0          0
   -> 192.168.1.137:443            Route   3      0          0

 [root@ha-lvs-2 keepalived]# ipvsadm -ln
 IP Virtual Server version 1.2.1 (size=4096)
 Prot LocalAddress:Port Scheduler Flags
   -> RemoteAddress:Port           Forward Weight ActiveConn InActConn
 TCP  192.168.1.140:80 rr
   -> 192.168.1.136:80             Route   3      0          0
   -> 192.168.1.137:80             Route   3      0          0
 TCP  192.168.1.140:443 rr
   -> 192.168.1.136:443            Route   3      0          0
   -> 192.168.1.137:443            Route   3      0          0

 前面提到的环回网卡地址就是192.168.1.140,这个是VIP地址,如果集群内的某一台lvs服务器挂了,它会自动飘到另外一台LVS上
原创文章,作者:admin,如若转载,请注明出处:https://www.starz.top/2021/01/08/blog%e9%ab%98%e5%8f%af%e7%94%a8%e5%ae%9e%e6%96%bd%e5%89%8d%e7%ab%af%e7%af%87/
相关推荐
-
升级blog的一次记录
前言 升级之前是用docker的wordpress镜像,默认的网站协议是http(基于apache环境),非SSL的,想到现在的网站都是采用HTTPS SSL方式了,我觉得也需要升…
-
日志篇——部署ELK日志系统
一、安装准备 以下部署场景BASE docker-ce、docker-compose环境 导入镜像包 2. 新建文件夹 3. 修改一下logstash配置 cat logstash…
-
BLOG DB高可用实施
一、部署环境 先克隆两台centos7的虚拟机 主机名:haproxykeepalived-3、4 关闭防火墙、selinux 1.haproxy部署(两台同步进行) 安装依赖 […
-
监控篇——部署AlertManager+企业微信告警
一、安装准备 以下基于场景prometheus环境 下载安装包 2. 部署安装包 二、部署 1.修改alertmanager.yml配置 cat /usr/local/alertm…
-
监控篇——部署Prometheus+Grafana
一、安装准备 以下部署场景BASE docker-ce、docker-compose环境 导入镜像包 2. 新建数据目录 二、安装部署 docker-compose配置 cat d…
-
BLOG DB实施主从
一、克隆原有的MySQL环境 二、移除克隆的从节点的mysql的auto.cnf文件(因为克隆出来的配置server-uuid相同会导致主从无法同步) [root@mysql-db…
